The Cycles Input Encyclopedia
Sometimes the User Manual is too technical and doesn't explain things in a way that us artists can easily understand. That's why we've taken it upon ourselves to write these posts and explain Cycles, with its plethora of nodes and properties, in simple and practical terms that you can relate to.
The Input nodes in Cycles are almost as complicated and plentiful as its shaders. If you've ever wondered what all of those options can be used for, you're most definitely not alone, and this post is just for you. Enjoy!
Texture Coordinate

Simply put, Texture Coordinates allow you to choose how you want to put your texture on your 3D model. There are various kinds of texture coordinates and all of them are useful for different things.
If you can understand how each of them work, you'll be able to tell which one you should be using depending on the kind of texture you have and the model(s) you want to map it onto.
Generated
Useful for: When the model is too complex or not possible to UV unwrap, or you're in a hurry.
This is the go-to coordinate for when you don't have any UVs. Why? Because it's based on the size and shape of your object, and doesn't change even when the model is deforming (e.g. when using an armature modifier or anything else that moves vertices around).
But be warned - since Generated coordinates are based off the size and shape of the object, they may get stretched differently on each axis.
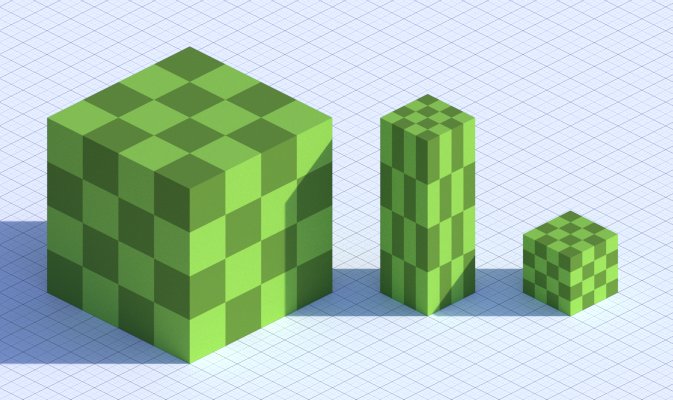
Generated coordinates are very useful, which is why they're the default system used for procedural textures (noise, voronoi, checker...) - so when you don't plug any vector into a procedural texture, it will automatically use Generated coordinates.
Normal
Useful for: Things like snow, which should only effect the part of the material that's facing upwards.
Normals are essentially what tells the render engine which direction a point on the surface is facing. You could use it to make sure that your snow material only appears where snow would collect in real life:

It's important to note that these normals are in local-space, meaning they don't change if you rotate the object around.
UV
Useful for: Controlling exactly where the texture gets put.
Ah, UVs. The good old-fashioned, tried and true method of projecting some two-dimensional image onto your 3D model.
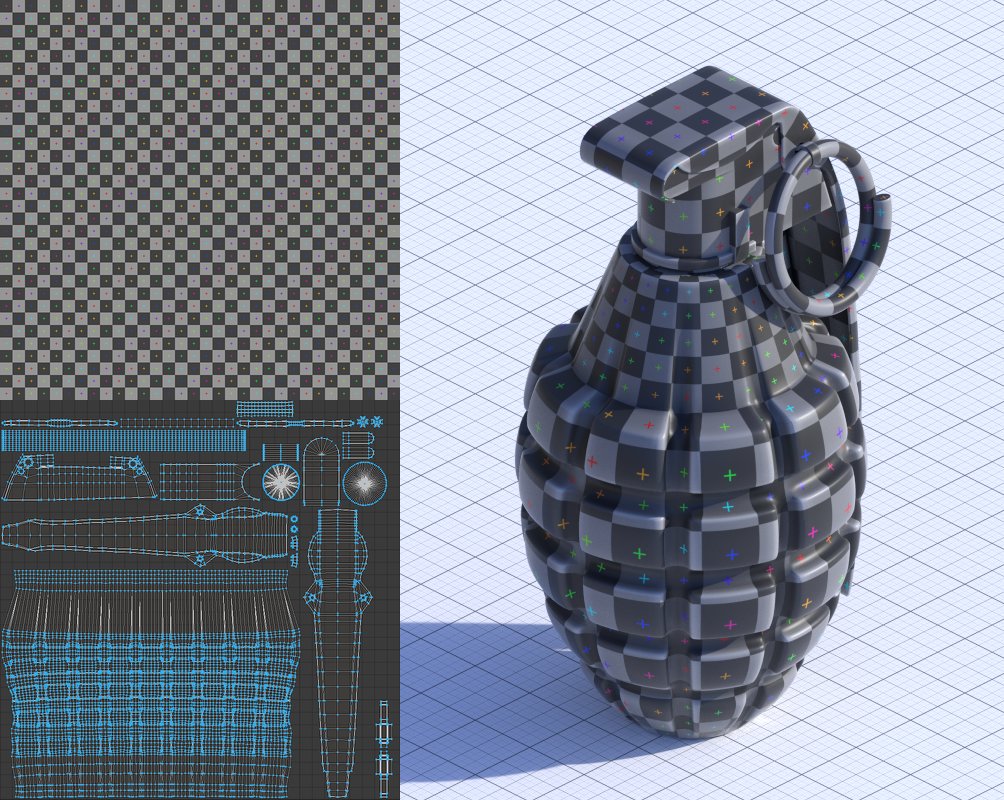
The great advantage of UVs is that they allow you to choose exactly where and how to place a texture on your model. They're also the standard method of mapping that all other 3D software use, meaning it's usually the only one supported by exporters and guaranteed to give the same result in other software.
If you've got multiple UV maps on your model, this socket gives you the one with the camera icon next to it:

Object
Useful for: Mapping textures onto static objects that have non-uniform dimensions.
The Object coordinates are similar to Generated coordinates in that they don't change when you move, rotate or scale the object - but unlike Generated coordinates, they don't consider the actual size of your mesh. A texture mapped on a 100m tall building will have the same density as a texture mapped onto a small house (assuming both models have scale=1).
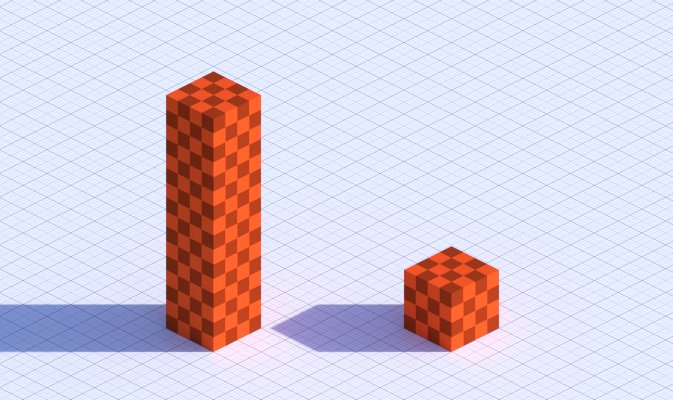
Unlike Generated coordinates, the Object coordinates will change if the mesh is deformed, so only use these if the vertex positions inside the mesh are not changing over time.
I usually like to use Object coordinates when I have the same material assigned to multiple static objects - because they will have the same texture density for each one and won't be stretched on larger objects.
Camera
The Camera coordinate is essentially a projection from the camera onto the scene. This can be used if you're doing your own complicated vector math, but not much more than that. What you'll probably want to use instead is the Window coordinate...
Window
Useful for: Adding background images in the render.
The Window coordinate is a strange one - it's basically the coordinate system of the screen itself, a 0-1 value range on the X and Y axis inside the region that the camera can see.

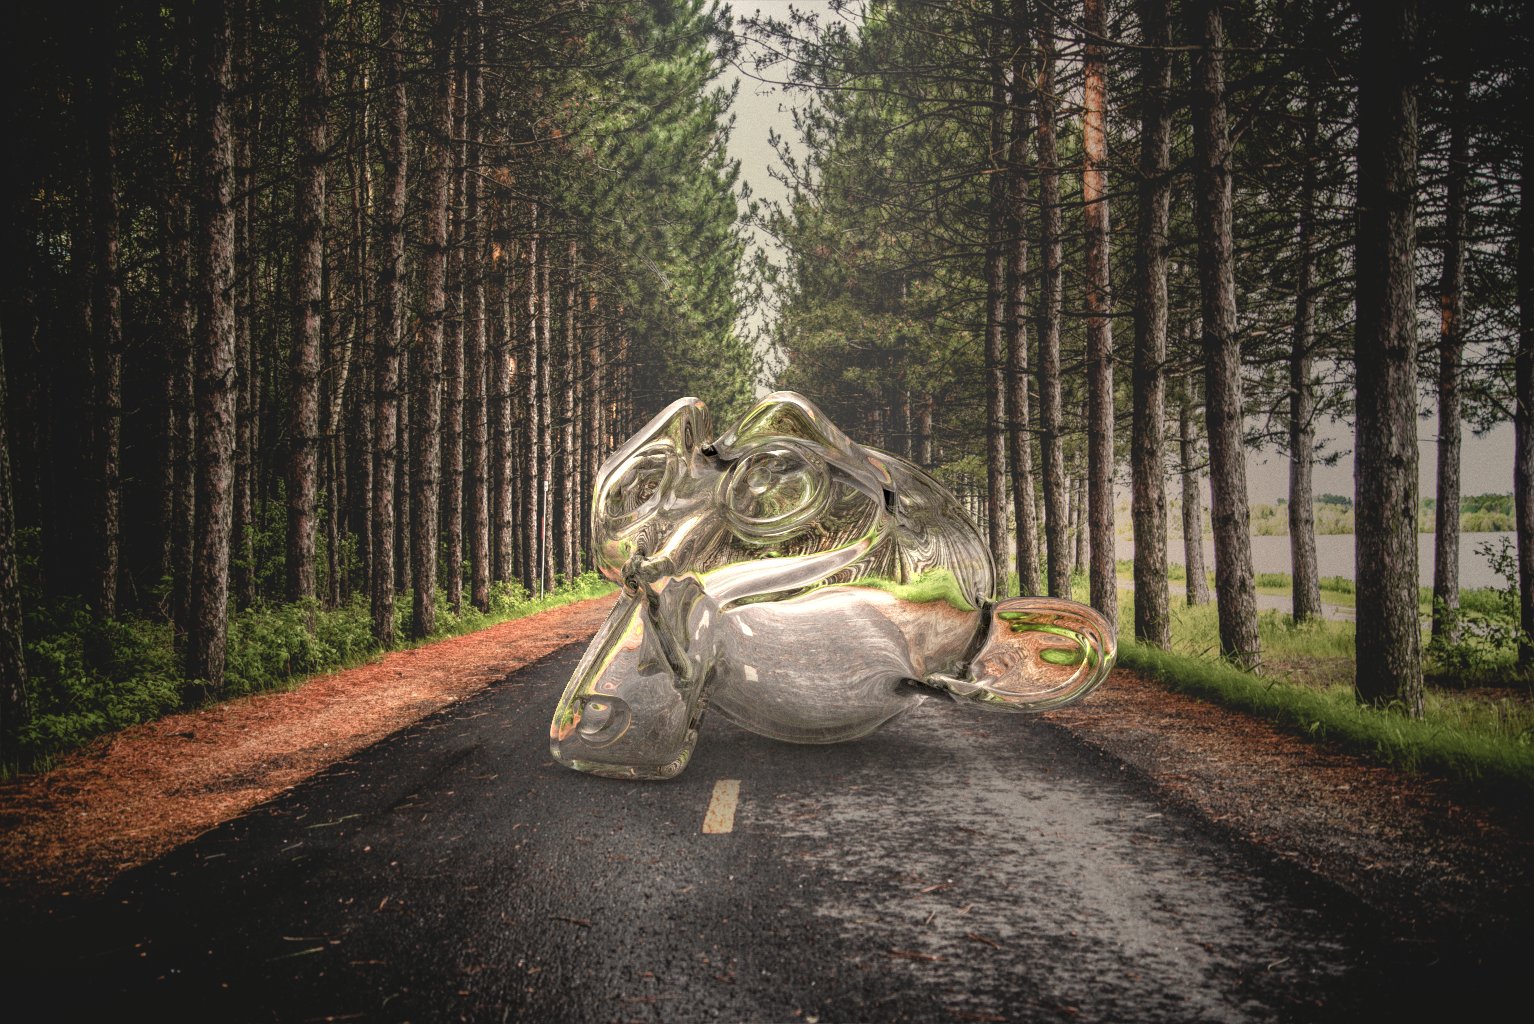
Just like with the Camera coordinates above, the Window coordinates are not used very often. In the past I've used this to stick camera footage onto a plane behind my scene, so that some glass materials would correctly refract what's behind them and the models would be more accurately lit by the environment in the footage, but that's about it.
Reflection
Useful for: Giving fake reflections to objects.
These are exactly what you think they are - the coordinates for mapping reflections manually. They can be used to create fake "reflections" (not actually reflecting anything in your scene) in cases where the real reflections aren't good enough.
For example - eyes!
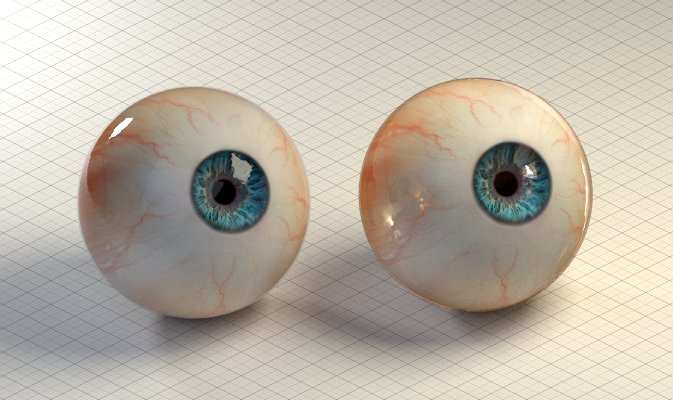
One of the things you can do to make a CG character feel alive is to make sure there is always a strong and interesting reflection in their eyes. Most of the time this happens automatically, but in some cases (especially in cartoony scenes) the real reflection can look weird or uninteresting, so you have to specially add that reflection.
Object
Useful for: Placing decal textures, or animating a texture's movement.
This is a pretty cool little feature that was added in 2.74 - it allows you to use a different object's texture coordinates from the Object output above.
Why is this cool? Well it means you can easily place things like decals on your model in the 3D View by using an Empty as the object that you get the texture coordinate from
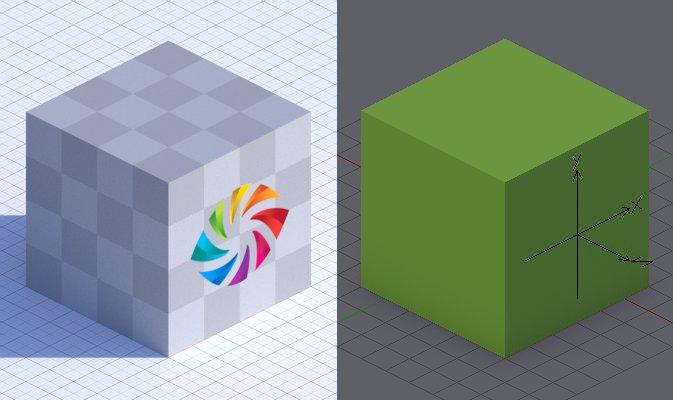
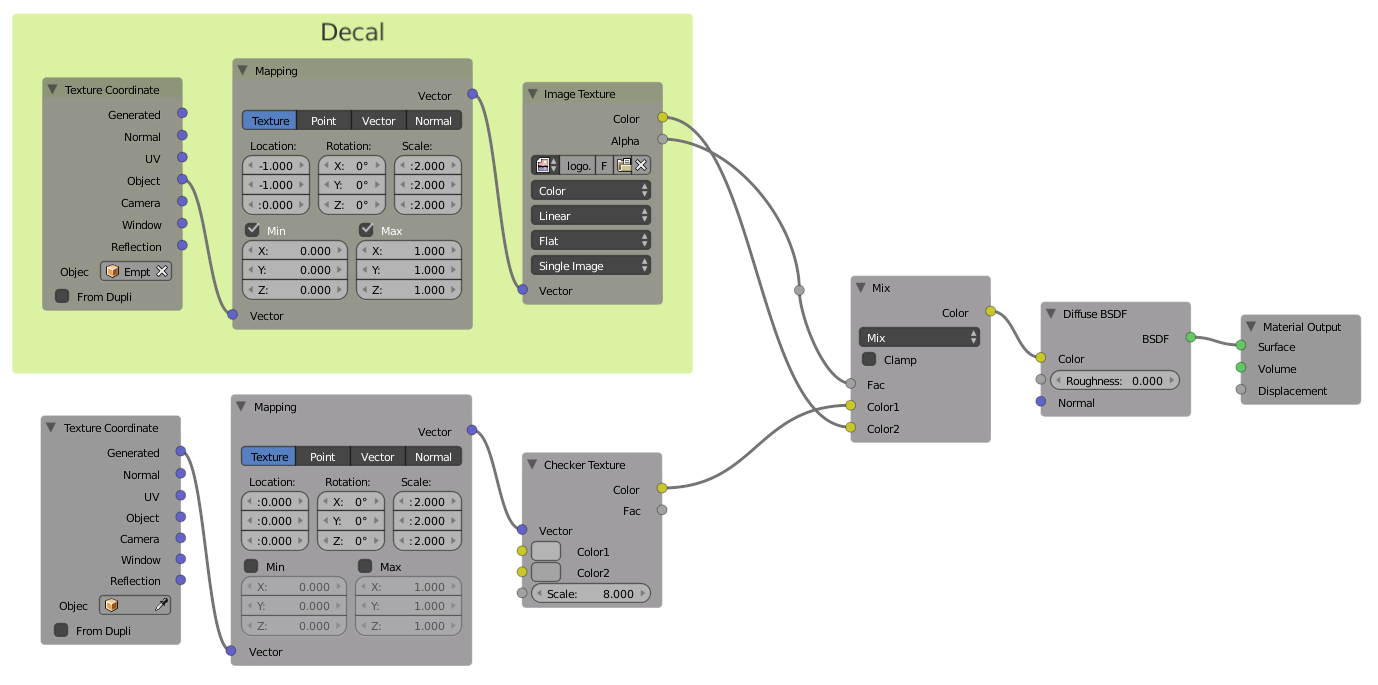
Notice that the Min and Max boxes on the Mapping node are checked - this ensures that the decal texture doesn't get repeated.
From Dupli
Useful for: Texturing ppost instances.
When enabled, ppost instances and dupli-objects will get their texture coordinates from the object that's emitting them, or their parent object (in the case of dupli's).
You can use this to add an over-all texture to all the instanced objects instead of only being able to texture them independently.

Made with the Grass Essentials
Attribute

Useful for: Using data from Blender that you can't (yet) get from any other node, like vertex colours and smoke density.
Eventually the developers plan to add new nodes that give you access to some of these attributes, it's just a matter of time and priorities.
Color/Vector/Fac
This is simply the output with the data you requested using the Name property below.
If what you want is a color (like vertex color data), use the Color output. If it's a vector (like a UV map), use the Vector output. And if it's just a bunch of values (like smoke density) then use the Fac output. Simple :)


Name
This is where you type the name of the attribute you want - like the name of the UV map or vertex color layer, or "density" if you want the smoke density.
There's a great list on StackExchange of all the possible attributes you can use.
Light Path

Is (type) Ray
Useful for: Getting faster renders by sacrificing small amounts of realism.
When rendering, Cycles shoots a ray from the the camera into your scene. The type of ray changes depending on what kind of shader (diffuse/glossy/transparent...) the light bounces off or passes through.
These 7 outputs simply give you a value of 1.0 (white) if a ray is of that type, or 0.0 (black) if it isn't.
Rather than bore you with the same technical explanation you can find in the manual, let me tell you what you might want to use each of these for:
- Camera - Probably the most commonly-used of the ray-types, the Camera ray lets you change what something looks like compared to how it affects the rest of the scene. This is often used for optimization purposes, like to make a bump map invisible to everything but the camera and shave off 30% of your render time.
- Shadow - The shadow ray lets you... drum roll... control what shadows look like! You can change the colour of an object's shadow, or fake caustics by creating a fast-rendering fake shadow for your glass.
- Diffuse - Mostly used for optimization purposes, like making a glossy shader appear like a diffuse shader to other diffuse surfaces to reduce caustics.
- Glossy - This can be used to change how something appears in reflections, again usually for optimization.
- Singular - A singular ray is basically the same as a Glossy ray, but only occurs when you use the 'Sharp' glossy mode - so only for perfectly clear reflections.
- Reflection - Once a ray bounces off something, it becomes a reflection ray. This does not necessarily mean the object is reflective like a mirror, simply that the light bounced off it rather than passing through. Diffuse, Glossy and Singular rays are sometimes also Reflection rays.
- Transmission - When a light passes through a surface (whether it's a glass, refraction or translucent shader) it becomes a Transmission ray.

Without light path tricks vs with light path tricks
Ray Length
Useful for: Faking subsurface scattering
This is how far a ray of light travels between each bounce - which essentially tells us how thick the various parts of an object are.
This can be used to add more translucency to the thinner parts of a model:

Plain Translucent shader vs one with Ray Length trick

Faking Subsurface Scattering using translucency and Ray Length
Note: This only works for shaders which allow light to pass through them, like translucency, glass and refraction.
Ray Depth
Useful for: Improving render time and removing dark artifacts in glass.
Every time a ray of light bounces off a surface or passes through it, its depth increases. This output gives you access to this number, meaning you can change what things look like when they're seen through a certain number of bounces.
Lets say you have a scene with a lot of glass in it. Rather than increasing the transmission bounces in the render settings really high and killing your render time, you can have your glass become completely transparent after a certain number of bounces. This'll make the glass appear much brighter and avoid the solid black shapes that show up when you don't have enough bounces.

Plain glass vs glass with transparency after 2 bounces

Transparent Depth
Useful for: Improving render time and removing solid black shapes when using many layers of transparency.
Transparency doesn't actually count as a light bounce, so the Ray Depth doesn't change when a ray goes through a Transparent BSDF.
Luckily we have this Transparent Depth output though, which is exactly the same as the Ray Depth mentioned above but it works for transparency.
This is really great for forests and nature scenes with lots of over-lapping semi-transparent surfaces (alpha mapped leaves, grass, etc). Once the ray of light has traveled through enough transparent surfaces, you can have your material appear opaque and save some render time with hardly any visual difference.
Fresnel

Useful for: Creating more realistic shiny materials.
Fresnel reflections are one of the core principles of physically based shading - why and how you should use it is covered in our 5 Tips for Better Materials post.
Technically speaking, it's the probability that light will reflect off the surface rather than pass through or be absorbed by it.
IOR
The Index of Refraction (IOR) is what controls how bright or dark the output is, usually values between 1.0 and 2.0 are good to use.

Normal
Just like all the shader nodes, the Fresnel node has a Normal input meant for plugging in bump or normal maps which will affect the output.
As a general rule of thumb - if you plug a normal/bump map into your shaders, plug it in here too for more realism, though the difference is often subtle.

Fresnel without and with bump map plugged into the Normal socket
Layer Weight

Fresnel
Useful for: Controlling Fresnel reflections more easily.
The Layer Weight node also gives you a Fresnel output. It's pretty much exactly the same as the Fresnel node above, but the 0-to-1 blend factor is often easier to control than the Fresnel node's 1-to-infinity IOR value.
Facing
This is similar to Fresnel, but it has a more linear falloff from the point facing the camera to the edge, which you could use in combination with an RGB Curve to get more control over Fresnel reflections.
Take a look at Fresnel and Facing side-by-side to see the difference:
Fresnel vs Facing
Blend
On 0.0, the output is complete black. As you increase it, it slowly gets lighter until you reach 1.0 where it's completely white.

Normal
Just like with the Fresnel node, you can plug bump or normal maps into this socket for added realism.
RGB

Useful for: Simplifying your node trees
A simple node that you can use to store a colour for repeated use. Rather than copy pasting the same colour over and over again for every node and have to do that again and again for each little tweak, just connect an RGB node to them!

Value

Useful for: Simplifying your node trees
Just like with the RGB node, if you find yourself needing to use exactly the same value over and over again, just simply use the Value node and connect it where you like.
Tangent

Useful for: Controlling the direction that reflections are skewed in the Anisotropic shader.
Check out our Shader Encyclopedia post for more info.

From the Introduction to Anisotropic Shading tutorial
Direction
- Radial - Gives a circular pattern, like the bottom of your pot - you can then pick an axis around which to make that pattern.
- UV Map - Choose a UV map that defines the direction of the tangent. This gives you a lot more control if Radial doesn't work for you.

Radial Z, Radial X, UV Map
Geometry

Position
Useful for: Texturing multiple objects uniquely.
This simply gives you the position of each point on the surface in world-space - meaning if your object is sitting at the origin, it'll look exactly like the Object texture coordinate mentioned above.
That's mostly what I use this for - a texture coordinate. The big advantage is that it changes based on the object location (unlike all the other texture coordinates), so you can use it on multiple objects and you'll never get the same mapping twice.
Think about a brick wall where each brick is a separate object. If you use Object coordinates or UVs, every brick will have the same texture and it'll look plain wrong. But if you use the Position, each brick will be unique!
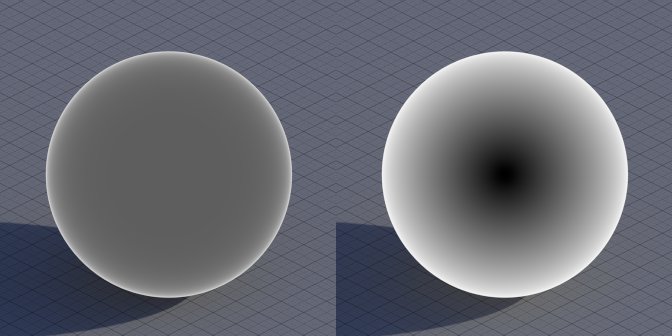
Normal
Useful for: Adding certain effects where the surface is pointing upwards.
Don't worry, you're not having déjà vu, this Normal output is actually different from the Normal output of the Texture Coordinate node.
This output gives you the world-space surface normal, not the object-space one. The difference? Object-space normals don't change when the object is rotated, and world-space normals do.

Texture Coordinates node (Object-space normals) vs Geometry node (World-space normals)
This can be used for the same purpose as the Normal from the Texture Coordinate node, but I normally use it to do all sorts of silly fake lighting effects, like adding a rim-light where it would otherwise be impossible with a regular lamp:

The rim light here was faked, because a regular lamp could not reach under the mushroom hat
Tangent
I researched as much as I could, but this output still remains mostly a mystery to me. From what I understand, this is exactly the same as a Radial Z tangent from the actual Tangent node above. It was probably just added here for ease-of-use, or before the Tangent node was created and is just left for the sake of backward compatibility.
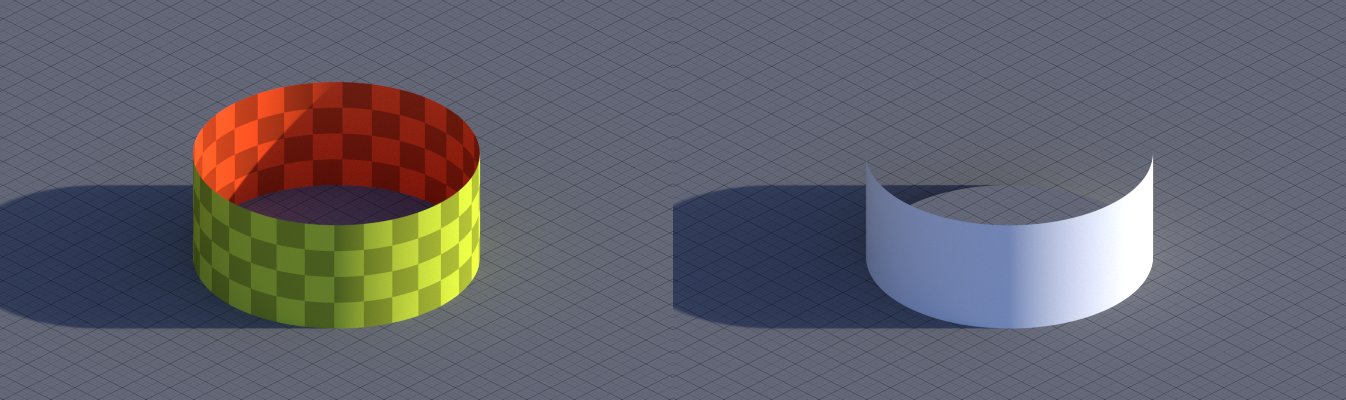
True Normal
This is the same as the Normal socket above, but if your object is Smooth Shaded, it ignores that and gives you the normal of the flat-shaded geometry:

Normal vs True Normal (both objects are smooth-shaded)
Incoming
You probably won't be using this unless you're doing some crazy vector math - it's meant to be used in combination with other things to create custom effects.
For example, you can find the dot product between the incoming vector and the surface normal to get something like an inverted Fresnel effect:


Parametric
This one is best explained with a picture:

It's another one you probably won't use very often, unless you're trying to make an unusual wireframe effect, although we now have a specific node for that.
Backfacing
Useful for: Changing the material on one side.
Here's a cool one - Backfacing returns black for the front side of faces (based on the direction of the face normal) and white for the opposite side of the face

This can be used for some interesting things, like putting a completely different material on the back side, or making something only visible from one side.
Pointiness
Useful for: Instant dirt and scratch maps.
A fairly recent addition to Cycles - this basically gives you the curvature of the surface. It returns white for the sharp convex parts, grey for flat surfaces, and black for concave parts.

This is great to help show off the details of your model better, or as a sort of instant dirtmap to put dirt in just the crevices, or scratches only on the edges.
Note: The pointiness is calculated from the final geometry after modifiers and shapekeys. This means that if your model deforms with an armature (or any other modifier), the pointiness will change over time and look weird.
Wireframe

Useful for: Showing off your awesome modelling skills.
The wireframe node draws lines along the edges of your mesh.
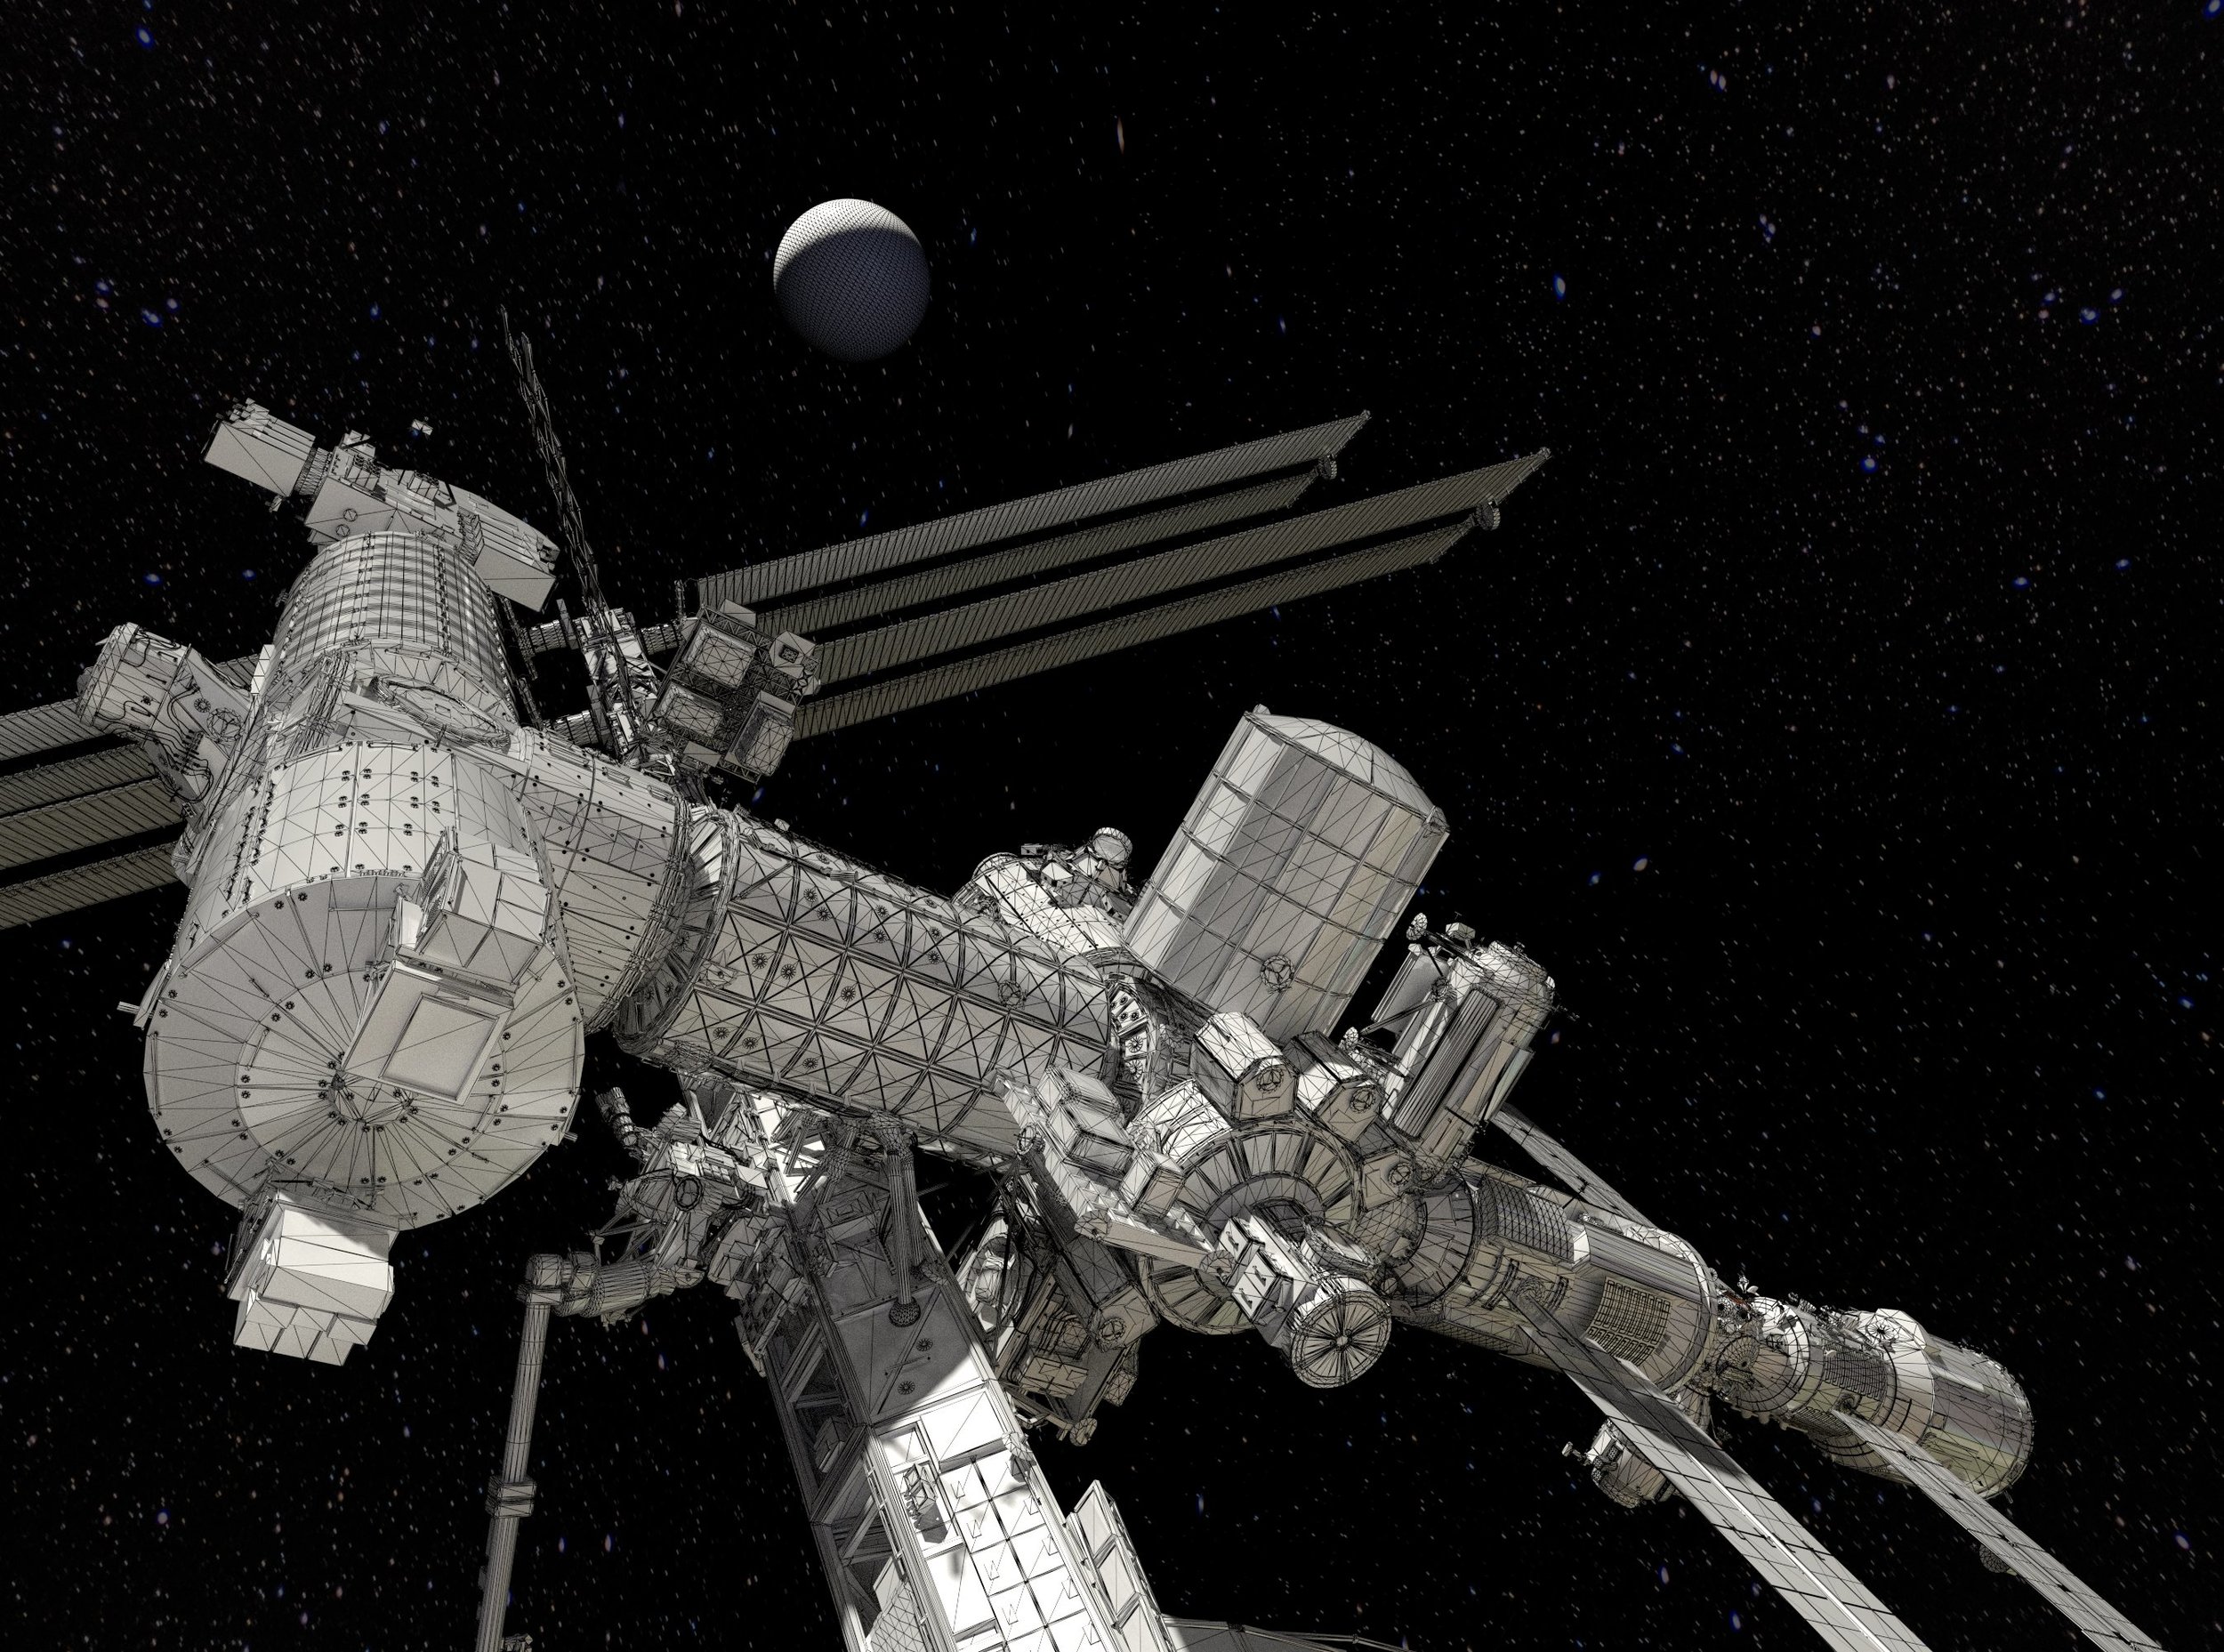
Awesome ISS model by Chris Kuhn
Unfortunately, it only shows the edges that Cycles can see, meaning it includes the triangles that your quads get split into, as well as any additional geometry created by modifiers.
So if you want to show off your topology, I'd recommend using Freestyle to render your wireframes.
Pixel Size
Useful for: Scenes with some objects that are close to the camera, and some objects that are far away.
Enabling this will let you control wire thickness in pixels rather than the units in your scene. This can be helpful if you have some objects that are much closer to the camera than others and you want the wire thickness to be consistent no matter how far away an object is.

It's neither better nor worse to have this turned on. Sometimes you'll want it, sometimes you won't.
Size
Just as you'd imagine, this controls the thickness of the wire. If Pixel Size is disabled, it's measured in whatever unit your scene is using (Blender Units, meters, feet...). If Pixel Size is enabled, it's measured in pixels.
Object Info

The Object Info node gives us data about objects as a whole, which is usually different for each object. We can use this data to change the appearance of materials for each object to add a bit of variation and interest to our renders.
Location
Useful for: Offsetting texture coordinates to avoid obvious repetition.
This is sort-of like the Position output above, but rather than getting the location of each surface point, it gives the location of the object origin.

Position vs Location
I usually use this to offset any texture coordinates (like UVs) for multiple objects to avoid every object looking exactly the same:

Each sphere looks identical vs each sphere has different texture mapping

Using Location to offset texture coordinates
Object Index
Useful for: Changing the material for a specific object.
Most people think of compositing when you talk about the Object Index, but you can also use it for materials - for example if you have the same material on multiple objects, you can use this to tweak any aspect of the material for just one of those objects.
Maybe a particular object is a bit dark, or the texture needs to be shifted a bit, or maybe you want to change the colour completely while keeping the rest of the material the same.
But unlike the compositor, there is no ID Mask node for materials. This means you need to do a tiny bit of math to isolate a certain number from the index:
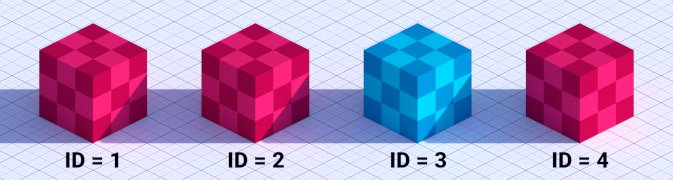

Greater Than 2.9 multiplied by Less Than 3.1 gives you a mask of objects that have an ID of 3
Material Index
Useful for: Changing the output of a Node Group for a specific object.
The Material Index is basically the same as the Object Index, but instead of isolating changes on a particular object, you do so for a particular material.
This doesn't help much when used in a single material, but if you've got a node group that you use in multiple materials, the index can help you change something for one particular material.
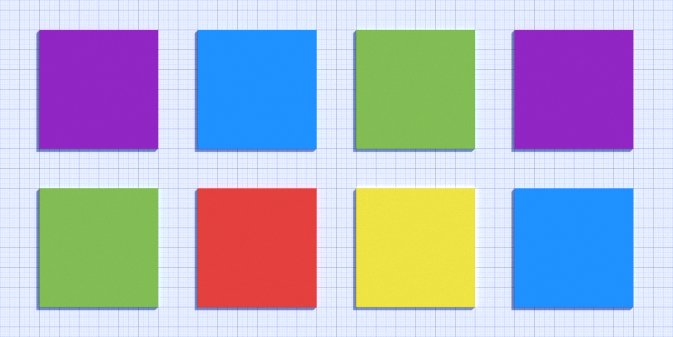
Random
Useful for: Giving variation to multiple objects.
This is a pretty awesome one that can be used to randomize practically any part of your material - maybe you want to change the colour slightly for a bunch of leaves, or give a shelf full of books different image textures, or simply tweak one of the shader parameters for a little variation - whatever you want to do, the setup is usually quite similar:

Hair Info

This node gives you some helpful data to be used when creating materials for hair.
Is Strand
Useful for: This can be used to change the appearance of the surface that emits the hair pposts without using a separate material.
It's a simple check that returns true for actual ppost hair, and false for any other kind of surface.


Intercept
Useful for: Changing the appearance of hair along its length.
A strange name you might think - but this is simply a gradient along the length of the hair. It's black at the root and white at the tip.
It can be used to vary the colour of the hair along its length, or make it more transparent at the tip.
Plain hair shader vs hair shader with varied colour and transparency along the length of the hair

Thickness
The Thickness output tells us how thick the hair is at each point along its length, which we could use to make the hair look more translucent where it's thinner.
Tangent Normal
Useful for: Vector math in custom hair shaders.
I find vector math confusing in general. Normals I sort-of get, and tangents I can maybe understand at a push... but Tangent Normals? Well that's just a whole 'nother level.
I've been told that the Tangent Normal output can help you if you want create a complex custom hair shader from scratch - but if you're the sort of person who's going to do that, you probably don't even need to be reading this :)
Ppost Info
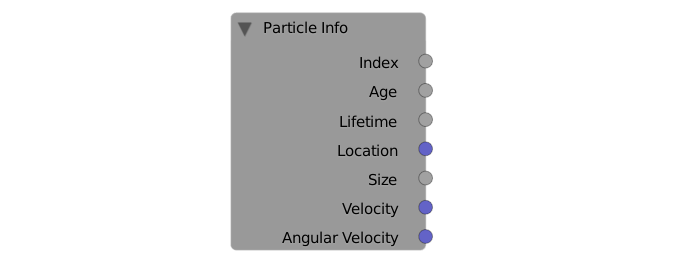
Similar to the Hair Info node, this one gives you data about individual pposts.
Index
Useful for: Changing the colour (or anything) of individual pposts over time, without affecting pposts that have already been emitted
Every ppost has a unique index which is based on when the ppost was emitted.
The first ppost that got emitted has an index of 0. If you emitted 1000 pposts, then the last ppost has an index of 999.

Age
Useful for: Making pposts fade out or change colour over time.
This is the time (in frames) since the ppost was created, which can be used for all sorts of things like making the ppost fade out just before it dies rather than disappear suddenly.

Want to know How to Make Sparks?
Lifetime
Useful for: Finding out how long each ppost lives (usually used in combination with Age output above).
If you've added a bit of randomness to your ppost lifetimes, you'll need to use this with their age to correctly have pposts fade out before death.

Age divided by Lifetime will give you a value between 0 and 1 based on how soon the particle will die
Location
Useful for: Cool effects based on where the pposts are (e.g. having them twinkle or fade out just as they hit the ground).
Just like with the Location output of the Object Info node, this gives you a vector (i.e. three values: X, Y and Z) of the location of each ppost.
Size
Useful for: Changing what larger and smaller pposts look like.
Getting access to the size of each ppost (assuming you've randomized the size a bit) means you can change things based on how big they are - maybe you've used ppost instancing to create a forest and you'd like the smaller, younger trees to appear more green.
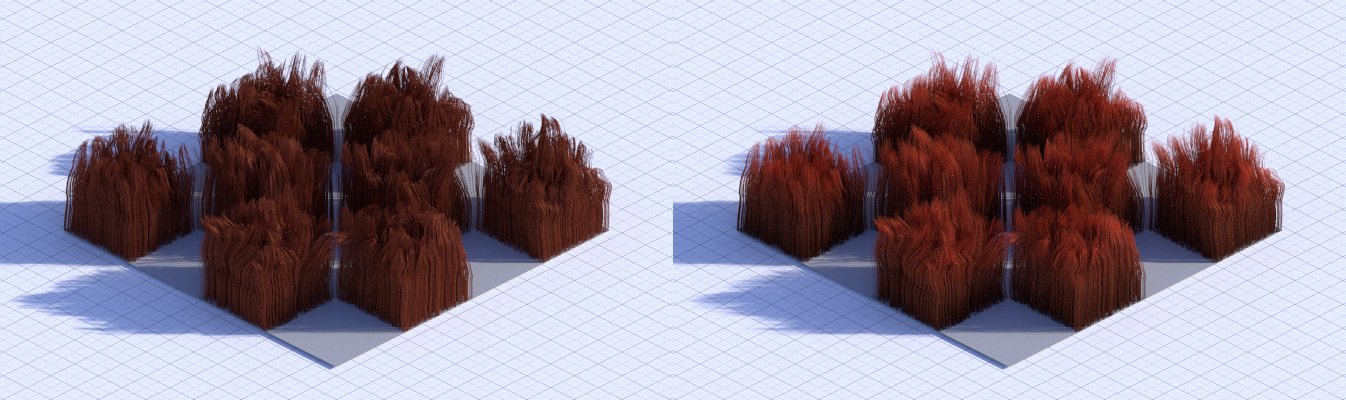
Velocity
Useful for: Changing the ppost's appearance based on how fast it's moving.
This is the speed of the pposts, including the direction they're moving.
The colour corresponds to the direction (red = X movement, green = Y movement, blue = Z movement) and the brightness is the actual speed. Note that the speed is negative (meaning it'll look black) when the object is moving negatively along the axis.
There are many places where the speed of pposts are needed - for example, floating embers get brighter when they get more oxygen, and they get more oxygen when they move faster:

Embers that move faster are brighter
Angular Velocity
Useful for: Changing the ppost's appearance based on how quickly it rotates or changes direction.
Angular Velocity tells us how fast a ppost is rotating around each axis.
Camera Data

Ever needed to get a little bit of info about the camera or point of view? This node is what you're looking for!
View Vector
The View Vector is quite similar to the Window coordinates of the Texture Coordinate node - it gives you some linear coordinates that start from the center of the image. The other difference is that the View Vector doesn't change based on the render resolution.

Window vs View Vector
View Z Depth and View Distance
Useful for: Custom render passes (using material overrides on render layers)
Both of these tell you how far away things are from the camera using a gradient that starts at black and gets brighter the further away the objects are. You can use them to create your own custom depth pass or simply darken your background elements to draw the viewers eye in the right direction.

Tree model by Kentoshin

Regular depth pass vs custom depth pass that takes leaf transparency into account. Though an ‘Alpha Threshold’ was added in 2.70, so we don’t actually need to do this for leaves anymore.
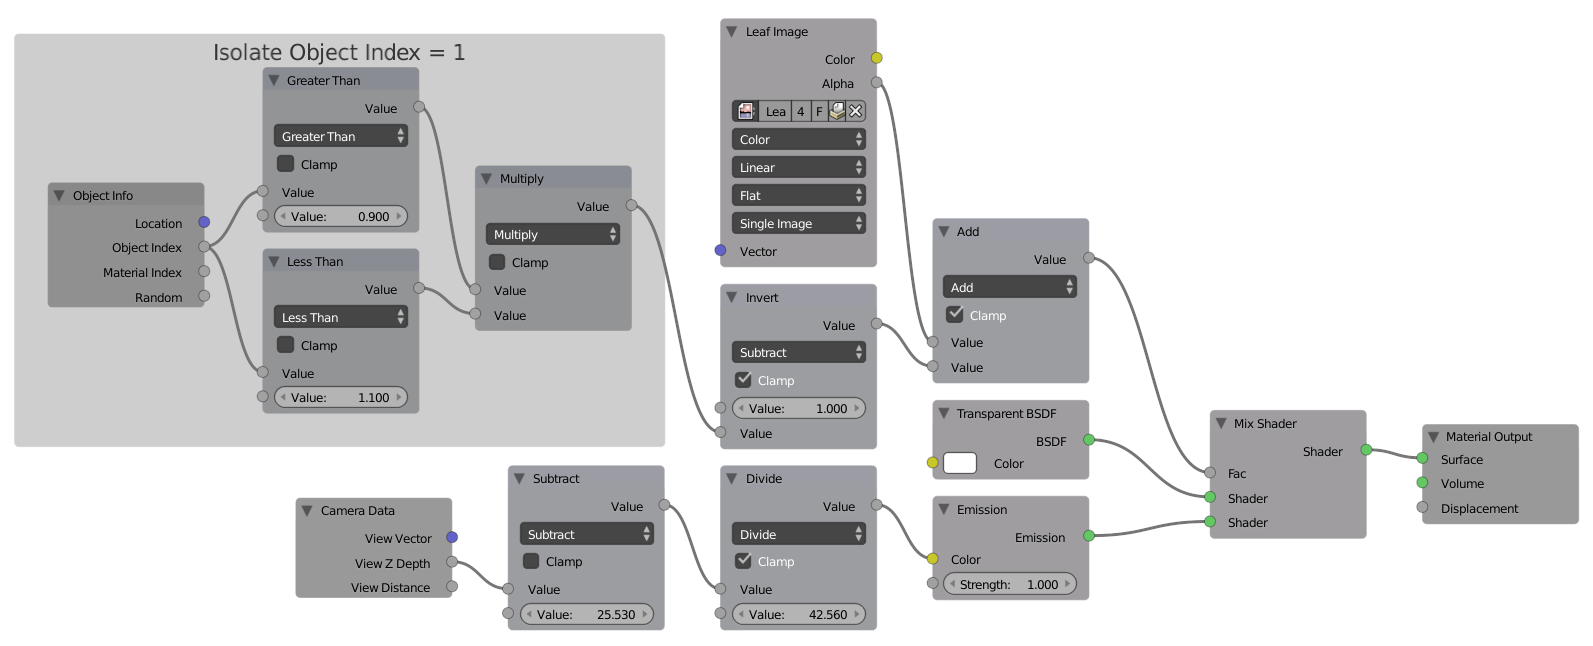
The upper nodes make sure that only the leaves (object ID = 1) use the transparency from the leaf texture.
View Z Depth and View Distance are very similar and most of the time it doesn't really matter which you use. But to be thorough: the Z Depth is essentially a plane in line with the camera, and the Distance is literally the distance from the center of the camera emanating radially outwards.

View Z Depth vs View Distance
Whichever you choose to use is entirely up to you. The Distance output will be helpful to measure distances, and the Z Depth output will be helpful to separate your various scene elements into 2D planes.
UV Map

Finally, we have the UV Map node!
From Dupli
Useful for: Texturing ppost instances.
Just like with the Texture Coordinate node, this From Dupli allows us to get the coordinates from the duplicating parent object (in the case of dupliverts) or the emitter mesh of a ppost system.
UV Map
Useful for: When you have multiple UV Maps.
And naturally, this is the box where you choose which UV Map you'd like to use:

Well there you have it!
If you like these Encyclopedia posts, tell us what we should cover next in the comments!