
6 Tips to Stay Motivated During Big Projects
Embarking on a new project always inspires feelings of excitement and creative energy. But as the weeks wear on and roadblocks add up, motivation fades away. As you lose heart to insurmountable challenges, it's tempting to simply abandon the project. But that would surely solve nothing!
In fact, if you don't give up and instead push through moments of frustration, you'll inevitably learn new things. So what can you do to stay motivated?
My name is Anson Adams and I discovered six techniques for conquering challenging 3D projects while working on my “Dramatic Portrait” model, the top Blender artwork from August 2014:
1. Research before diving in headfirst
I first became hooked on Cycles after seeing Kent Trammell’s Cycles skin shader. I attempted to recreate it myself, but always fell short. I quickly realized that trying to learn by trial and error would kill my motivation.
Instead, I stuck to the advice of pros. CG Cookie provided a plethora of knowledge, including how to tackle Cycles skin, textured sculpt brushes,long hair, projection painting, and Cycles hair. Blender Foundation’s Sintel character served as a prime example of topology organization.

2. Study reference

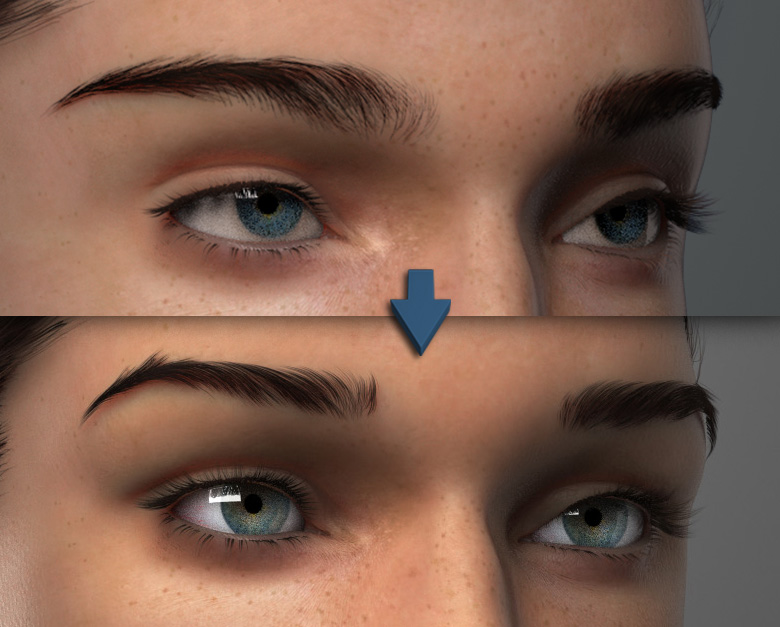
Your mind can play tricks on you in regards to proportions. The eyes and mouth are more prominent features of the face, so we're more likely to depict them as larger than they really are.
I relied only on careful observations made from reference images, setting them as viewport background images to make comparisons with my model.
Finding references of specific details can be next to impossible. In some cases, it can actually be easier to photograph your own. I recruited a family member to take photos of their "peach fuzz" with a macro lens:
3. Engage with the community
After returning from a break, I observed my model with fresh artistic eyes and found myself disappointed. My model looked off, but I didn't particularly know why.
So I turned to Blender Artists, seeking a fresh perspective. The advice I received, suggesting changes in different proportions, immediately pointed out the flaws. I didn’t implement every piece of advice, but at least considered how the commenters arrived at their opinions.
4. Forge your own techniques
Past a certain point, I could not rely on the guidance of others. I went through as many as four iterations of the eyebrows and eyelashes, each time progressing slowly but remaining dissatisfied.
As a result, I learned that realism cannot be achieved through generalization. Elements, like the eyelashes, look more believable if they are created with utmost specificity.
As I progressed into the sculpting process, I also realized the benefits of changing my matcap material — some capture larger forms while others reveal minuscule details.

For the skin material I used color, specular, normal, SSS scale, vellus hair density and eyebrow hair density textures. Painting textures from scratch is an arduous process, so I projection painted an image to start. With an image editor, I removed any highlights or shadows and softened the texture — the different shades should come from the scene’s lighting, not the texture.

5. Divide and conquer complicated elements
Juggling numerous tasks at once is a guaranteed way to feel overwhelmed and give up.
To combat this, break up complex objects into smaller chunks that you can tackle one by one. This way, you'll make progress more noticeable and in turn feel more capable and motivated.
The hair was actually comprised of seven different layers:

I began with the main volume of the head hair (shown in green). The teal stray strands counteract the mass and disrupt the uniformity. The side hair (orange) softens the hairline while back hair (red) adds realism with loose, individual strands.
Tackling these one by one meant I could focus on each individual task before moving on to something else.
6. Achieve precise control
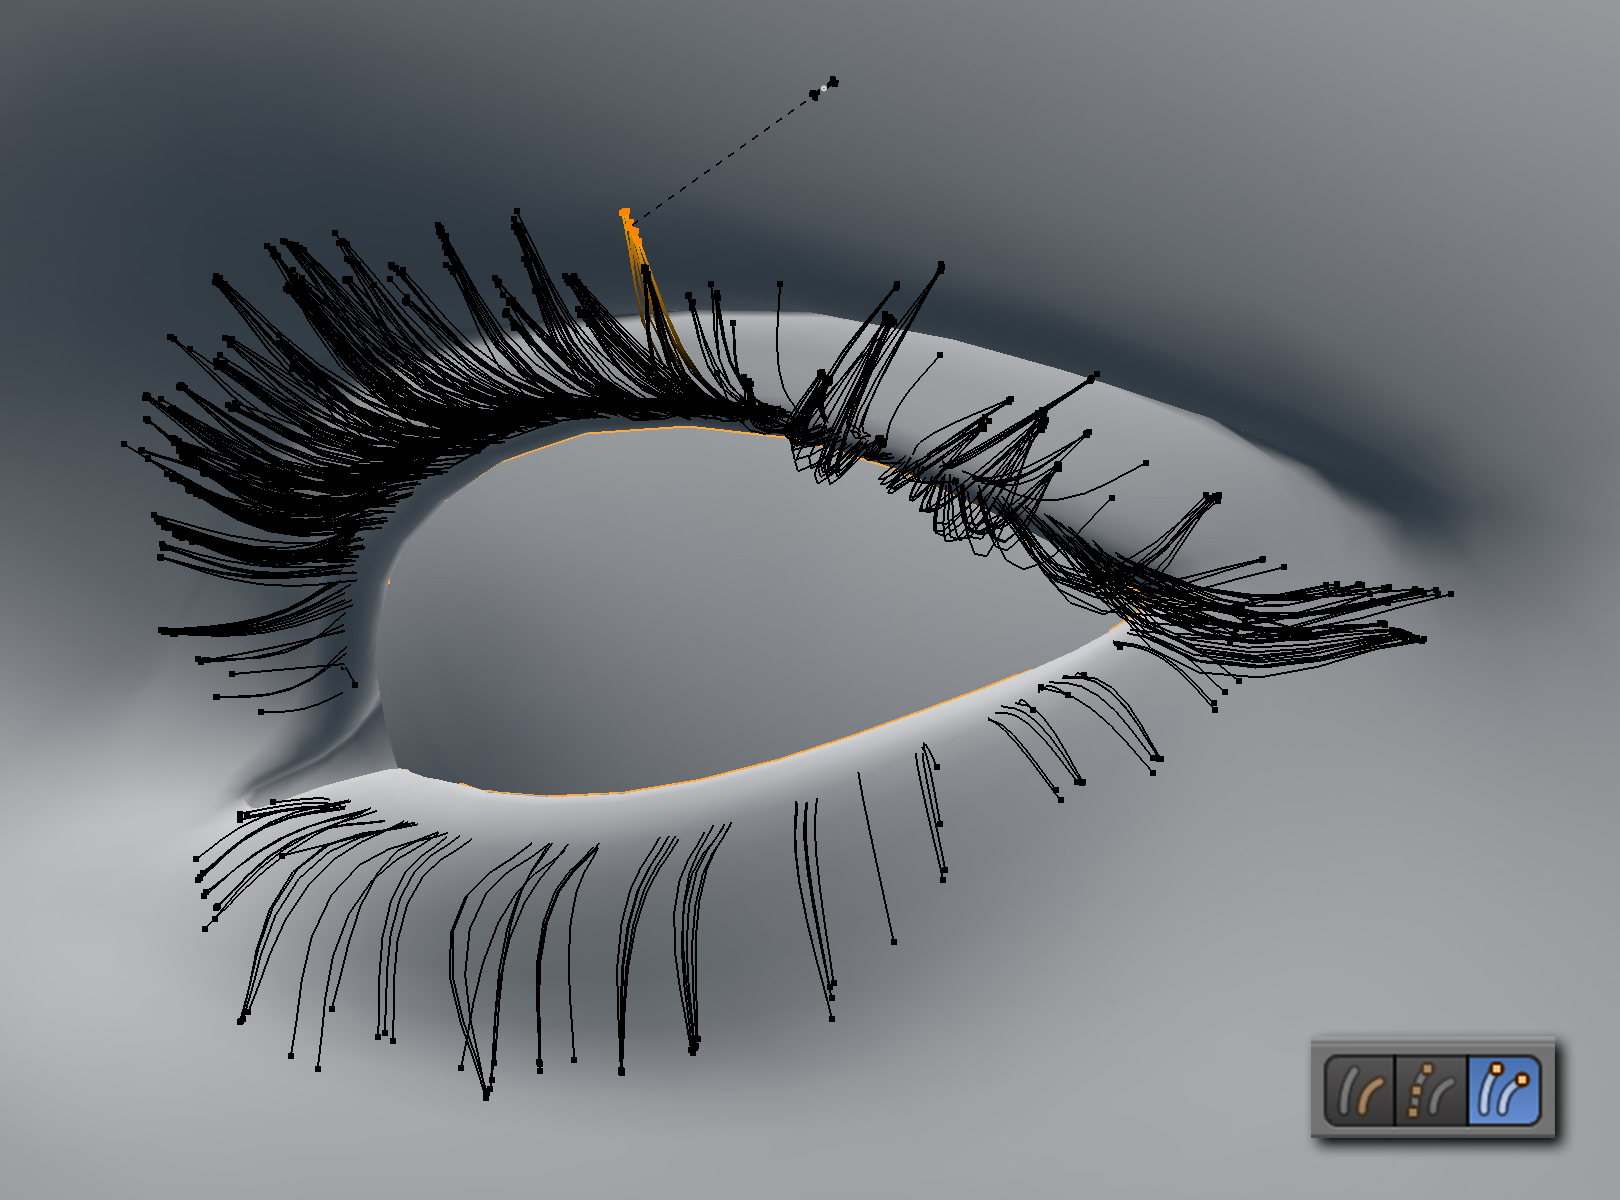
Your tools either help or hinder you. You may have made the necessary, astute observations, but they will only matter if you can bring them to life. In particular, the eyelashes were nuanced enough that I needed to control every single strand.
First, I generated a large number of hairs along a string of vertices on the eyelids. I cut all of the hairs except for the ones on the very rim and tapered the density off near the tear sacs. I then adjusted their lengths and combed a slight bend.
Finally and most importantly, instead of using clumped children, I selected the tips of eight to 12 hairs at a time and scaled down. This method offers ultimate control in creating the subtle shapes of eyelashes.
My eyebrows looked best when generating a large amount of hairs with seven to eight children each. A density map enables precise, non-destructive editing of the fade near the edges.
Eventually, I realized I needed control over the softness of the hairline. To fade in hairs from their roots, I mixed the hair shader with a transparent shader and set the factor to intercept in the hair info node. Members of Blender Artists reminded me this wasn’t enough, however, as I also needed to increase the maximum transparent bounces (Render > Light Paths > Transparency > Max). 15-20 bounces solved the problem!

The pink vellus hair is one of the most subtle yet important layers. I found 75 percent transparency to be just noticeable enough. To recreate the elegant flow of the vellus, I started by adding a small amount of tangent velocity (0.01) and tweaking the rotation (Pposts > Velocity > Emitter Geometry). I brushed the hair into a more specific flow afterwards. A density map helped me easily remove the vellus in unwanted areas, such as the lips, nose and eyes.
In conclusion
Once I had done my research and broken down the encountered challenges into manageable, smaller tasks, I was able to successfully finish the project instead of abandoning it.
When tackling difficult projects perseverance is always key, but hopefully these small tips can help you as well.

Tips for success:
- Resist the urge to move onto the next stage until you have polished the current – mistakes will be harder to fix later down the road.
- Pausing to reflect is critical – your artistic eye needs time to refresh and remaining objective enables you to learn.
- Remember your medium has three dimensions – don’t accidentally spend all your time working from one angle of the model.

PS. Check out Anson's latest title animation - it's pretty impressive! -Andrew